Developing QtQuick applications with Qt Designer
Developing graphical interfaces with QtQuick often involves collaboration with graphic artists and designers. Qt Designer is a tool created to bring developers closer to the world of graphics while designing QtQuick applications. But how useful is this tool? How reliable is it? Let’s try to understand it with a brief overview.
The Problem
First, it’s important to understand the problem domain.
The professional field of graphics differs profoundly from our familiar territory of software design and development. Two different but complementary worlds must inevitably communicate to reach a common goal: finishing the application on time and testing it on hardware.
Working together involves several things:
- coordinating on the specifications
- avoiding waiting for each other
- meeting needs for feedback, tests, and trials of all kinds
- being able to be productive in their respective fields with the respective tools
- achieving deadlines of various iterations during development
- avoiding doing unnecessary or duplicate work
A problem nevertheless emerges. Usually, graphic designers and developers work in a simultaneous and disjointed way, remaining in their respective worlds. The graphic designer creates a mockup of the application with their working tools (Photoshop, Illustrator, Flash, etc.) and passes the ball to the developer, who recreates the same interface from scratch in QtQuick.
Each change that the designer wants to make later must retrace the same road, that is, change the mockup, pass it back to the programmer, who will then have to integrate the change into the actual application.
The system as a whole is not Agile. The programmer can work in an Agile way in their world, the designer can do it in their own as well, but overall, the workflow is a non-iterative pipeline where it’s difficult to make changes.
Fortunately, there’s plenty of room for improvement with respect to this situation; let’s see where.
Objective: Agile Workflow
The goal is to adjust parts of our workflow to create a more Agile and productive setup for everyone.
The first step is introducing a tool that improves the handoff between two worlds: Qt Designer.
With Qt Designer, we aim to bring designers closer to the actual QtQuick interface development—and at the same time, make things easier for developers.
How? By visually exposing many QML features in a way that’s intuitive and accessible.
QtDesigner is a tool that aligns well with what non-programmers typically expect:
- Mouse-based interactions
- Drag & drop components (including custom ones)
- Abstraction layers that hide low-level developer concepts
- Interactive previews
- UI for editing properties, managing states, etc.
The idea is to empower designers to build and modify the application interface on their own—without needing developers to step in.
Mockups are created directly in QML, and every iteration of the interface can be done without writing or modifying code.
What is Qt Designer?
It’s helpful to clarify right away what Qt Designer is—and what it isn’t.
What Qt Designer is:
- A thin visual layer on top of QML files. It allows editing the UI without writing code by representing QML visually.
- Designed for creating and editing static pages.
- A reasonable balance between functionality and simplicity.
- Still under active development. 👉 Make sure to use the latest version of QtCreator to access new features and improvements.
What Qt Designer is not:
- It’s not a full-featured QML editor.
- It can’t create dynamic or animated pages.
- It’s not a complete replacement for a developer’s work.
So, what is Qt Designer good for? Qt Designer is ideal for building the visual layout of QtQuick components—adjusting properties like placement, anchors, states, and styling.
Style and Scripting
Qt Designer is not meant for scripting or implementing logic. It focuses purely on the visual structure of the interface. That means logic elements like timers, loaders, and other functional components should be kept separate from the visual layer.
In this context, Qt Designer works with a dedicated format: .ui.qml files.
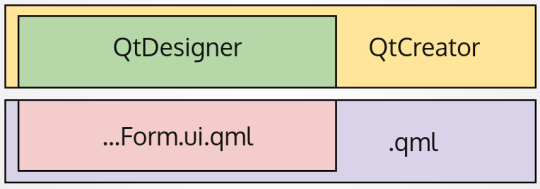
Qt Designer solely and exclusively creates, saves, and modifies the .ui.qml files following a convention. Each component is constructed by combining two files, the logic file (which will contain the dynamic elements, JavaScript scripts, etc.) called in the conventional MyComponent.qml mode, and the interface file, which will instead be called MyComponentForm.ui.qml.
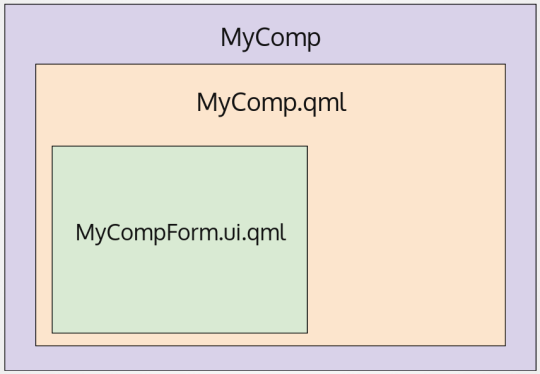
The QML logic file will extend the interface file. The interface component, on the other hand, will expose, with aliases, all of those elements in its interior that have to be properly implemented
// MyButtonForm.ui.qml

Rectangle {
    property alias label: label
    property alias mouseArea: mouseArea

    Text {
        id: label
    }

    MouseArea {
        id: mouseArea
        anchors.fill: parent
    }
}

// MyButton.qml

MyButtonForm {
    label: getLabelFromJS()

    mouseArea.onClicked: {
        console.log("Hello World!")
    }
}
It’s important to avoid adding elements that are incompatible with Qt Designer into the .ui.qml file—such as Loader, Timer, and similar components.
Two Development Modes
Let’s briefly explore two different ways of integrating Qt Designer into our workflow.
QML Mockup
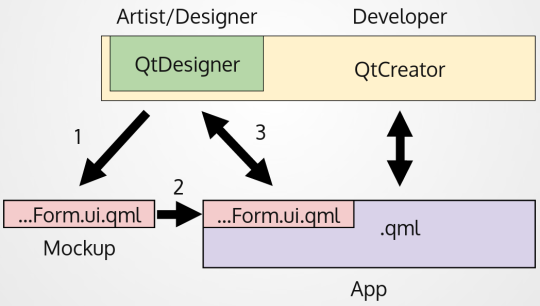
By using Qt Designer, graphic and UI designers can build mockups directly in QML (1).
This means developers no longer need to recreate the page for the Qt Quick application—they can simply integrate it (2), and then focus on adding the dynamic behavior: loaders, animations, transitions, scripting, and so on.
From that point on, designers can continue to modify the visual layout of the already-integrated pages directly using Qt Designer (3), without needing further developer involvement.
Non-QML Mockup
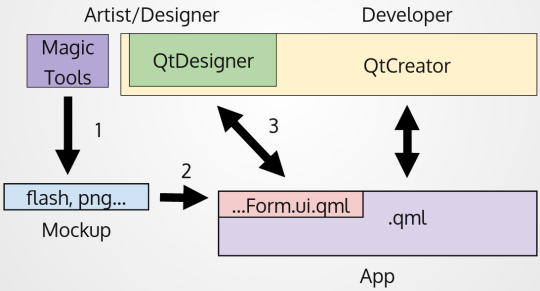
In this workflow, the designer continues to create mockups using their preferred tools (1), while the developer translates them into QML pages as usual (2).
The key difference is that—by planning ahead to use Qt Designer and keeping the scripting separate from the component layout (.ui.qml vs .qml)—the designer will still be able to iteratively update the interface directly within the application using Qt Designer.
Which approach should you choose?
It depends on the context—decisions can be made page by page, component by component.
Designers who are open to learning and using new tools may be more productive by building mockups directly in Qt Designer.
On the other hand, more complex components might still require being structured entirely by the developer.
What can the designer do independently?
So, what exactly can a designer do on their own with Qt Designer, without involving a developer?
- Create static mockups directly in QML
- Define and edit any style-related property (colors, sizes, fonts, etc.)
- Arrange components using anchors and layouts
- Add or remove components already defined in a page
- Make any changes that don’t involve application logic
This doesn’t cover everything, but it’s a big improvement over having to rely on a developer for every small change to the UI.